


Here I would like to present a small compilation of my astro photography. All of which were made with a normal SLR camera. Even without telescopes and expensive motor driven mounts one can gather quite a few nice pictures of the night sky and wet ones appetite maybe to get some serious equipment.
The pictures show the great comet of 1997 - Hale-Bopp. That is driven by the fact, that such a display is of course a splendid reason to make widefield astro photos. This comet founded also the motivation to photograph the night sky more often.
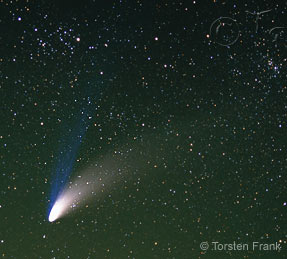 The photo to the left shows comet Hale-Bopp, taken 07th April 1997 at 20:35h (ut) with a 28-70 mm Zoom set to 70 mm and f /3.5.
Film used is Fuji Sensia 100, pushed to ISO 200. Pushing means nothing more than to use an exposure setting for a film with higher speed and have this corrected at the processing. The photo got exposed for 10 Minutes. As you can see, the stars and the comet tack sharp.
This result can only be achieved with some kind of mount which compensates for the earth's rotation. With a fixed tripod setting, the picture below would be the result. All elements in the frame are depicted as streaks.
So, first I said you won't need special equipment and then I show you a photo which was made with some kind of special equipment? Yes - but such a mount which I used for this photo (a barndoor mount) is easy and cheep to build. Further below on this page, I have added an instruction on how to build such a simple, handdriven barndoor.

As stated before, the picture to the right shows the result of a longer exposure over several minutes, made with a tripod. This is also good for nice photos. Exposure dates: 31th March 1997, 50 mm Lens, f/2.8, 12 Minutes.
A more classical version of such star trail photography can be seen in the Photo Gallery. To get a start search a horizon which makes for some neat silhouette, set the focus to infinity and open the shutter for at least 30 minutes to several hours. The camera should be mounted to a real sturdy tripod and there should be not that much wind (in case of not so sturdy a tripod or tree silhouettes as horizon). The maximum possible exposure time is also a question of the light pollution of your photo location. That means that in or near a city shorter exposures can be made than in rural areas before the sky background gets to bright.
With astro photography more than with any other type of photography one should not be satisfied with the result of the developed film in the first step. The processing with an image processing software like e.g. Adobe Photoshop, Paintshop Pro or other is more or less mandatory. Normally all of my pictures are direct scans from slide film - either via Kodak Photo CD service or for my newer work with personal high quality desktop slide scanners.
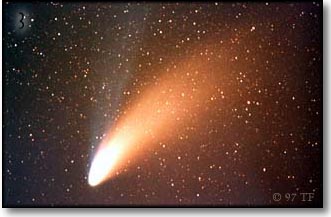
To make my point, here a short example what result is shown on a normal print from a commercial lab (here directly from the negative film) - Picture 1 - and what can be achieved with some little tweakings with an image processing software. Picture 2 shows the result of applying unsharp mask filter and adjusting curves. For Picture 3 the previous one got enhanced with a contrast mask and the result was stacked twice. This picture got then brightened with the blue channel of this picture only (which shows the most detail of the blue plasma tail) and the result is shown in Picture 4.
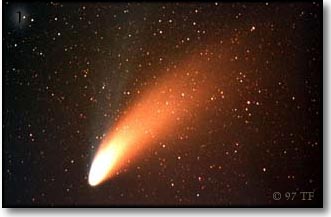


Photographed 01st April1997 at 21:40h (ut) with a 70-200 mm Zoom, set to 200 mm, f/2.8 on Fuji Super G+800, 8 Min. tracked with handdriven Barn-Door-Mount
![]()
A homemade Barndoor
To capture long exposures of the night sky with pinpoint sharp stars, one needs some kind of mount which compensates for the earth's rotation. Because otherwise the stars would be captured more or less in form of trails rather than points.
The simplest and cheapest possibility is to build a so called Barndoor, also known as Scotch Mount.
Fortunately, the web community is always quick on reaction, and so a lot of web pages with instructions to build various forms of barndoors appeared in anticipation for the comet Hale-Bopp. For me to follow easiest was the comprehensive instruction of Brian Rachford for a hand driven barndoor with isosceles single arm design. I would like to present here my slightly modified version and also give the according measures in SI units. I will close with some hints on how to use the barndoor in the field (set up and polar alignment). (A remark: After a long time where it seemed that Brians page gone the way of all worldly things, it is slightly enhanced online again. Therefore I include the link to his Barndoor-Project here.)
After the following instruction everybody should be capable to build his own barndoor drive for little money.
First, the photos of my barndoor (I left the german text - I think the pictures speak for themselves):

Barndoor Photo 1 Barndoor Photo 2
 Barndoor Photo 3
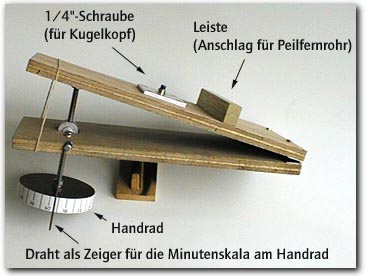
The first photo shows a general view of the barndoor - basically two pieces of plywood (9 x 26 cm) connected with a piece of piano hinge (the axis of this hinge will point to the celestial pole when using the barndoor). The lower board get fastened on a tripod with a ball head or a pan/tilt head and on the top board the camera will be positioned - most effectively with a ball head. For the well defined extension movement of both boards cares the threaded rod in distance L of the hinge (Photo 2). That's the trick.
The exact distance L results out of the formula:
L = 228,56 / rise per mm of the used threaded rod
I used an M6 threaded rod (length approx. 14 cm) with a rise of 1 mm, therefore L equals 22,9 cm.
The important point with an isoceles design is the pivoting bearing of the threaded rod in the lower board, keeping the distance L always the same during the extension of the boards - as well as in the lower as in the upper board - regardless of the angle between both "legs".
Contrary to Brian I used two little aluminium angles, which I fastend in the lower board. An according steel ring was fitted on an threadless rod and through this assembled combo a M6 threaded hole got cut. This is the bearing for the treaded rod. It rotates in the two aluminium angles which are mounted in a sqaure hole in the lower board such that the rotating axis is exactly in the distance L from the hinge. The contact point of the threaded rod in the upper board is just a simple hole (just approx. 4 mm deep) also in distance L from the hinge. This hole holds the top of the threaded rod loosely in position. Therefore, a ball nut will be screwed on the top of the threaded rod.
On the lower end of the threaded rod a turning wheel got fastened (see this links for motors for barndoor mounts - although in my opinion, before considering this effort, one should opt for a real motordriven equaetorial mount). Because of the principle of our construction the threaded rod has to do exactly one revolution per minute. To make this task easier, the turning wheel got a scale around it, which shows exactly 60 seconds. I made marks every two seconds. As a rule of thumb, one should turn the wheel during exposure with a 135 mm lens every two seconds the appropriate amount and with a 50 mm lens every 4 seconds - with wide angles lenses every 6 seconds suffice.
For the mounting of the barndoor on the tripod and the mounting of a ball head on top of the barndoor the normal 1/4" screws are needed. Foto-Brenner offers small bags of assorted 1/4" and 3/8" screws and nuts which I used here.
Because I use my normal full size ball head on top of the barndoor, I didn't need any spacer cubes on the top board to get enough clearance for the camera. The ball head just got screwed on a 1/4" screw wich is fastened on the top board. A rectangular aluminium plate offers a plane surface around the nut.
For the montage of the barndoor on a tripod, the lower board needs a 1/4" nut fastened on it. Like the nut on the top board this nut is flush mounted in a small aluminium plate (Foto 3). An appropriate hole got drilled in this plate and then the shape of the nut got finished with a file. The nut got then hammerd into place. This is a rock solid connection provided the shape of the hole is not wider than the shape of the nut. Additionaly, some "noses" are hammered over the top of the nut. This plate then got screwed on the lower board.
So, finished - now the first successful field test should be an easy task. Normally I should show you some photos of the complete setup ready to use with tripod and camera but I think the provided links at the end of this page will suffice to get enough impressions. But the most important condition for the employment shall be explained in the following.
Polar Alignment
As was stated above, the hinge of the barndoor has to show to the celestial pole when in use, simpler said, to Polaris, the North Star. Well, not exactly to Polaris, since the north celestial pole lies some 0,8° (48 arc minutes) next to it. After a rule of thumb one can expect some 2.5 arc seconds deviation per exposure minute for every 10 arc minutes misalignment. So it should be strived for an alignment not more than approx. 15 arc minutes away from true north celestial pole, which should be quite possible with the following method. With that, exposure times of around 20 to 25 minutes with a 50 mm lens and around 10 miunutes with a 135 mm lens are possible before tracking errors become obvious.
How do we achieve alignment? Look at the strip of wood ("Leiste") in figure 1 absolutely parallel to the hinge. I use this strip to guide a cheap finder scope of a rifle. For my comet shots I doesn't had a finder scope available and used a simple, small binocular like one often gets as an advertisment present.
First, search Polaris. As everybody knows, we can find it very easily by extending the virtual straight line between both of the back side stars of the Wain 5 times - see picture below (in german we refer to Ursa Majoris as "Großer Wagen" which in british english is Charles' Wain or the Wain as my dictionary tells me - of course, if you are used to the american description you have to extend the virtual straight line between both the front stars of the big dipper :-)).
North celestial pole lies between Lamda Ursae Minoris and Polaris. The middle of the virtual connecting line between these two stars is onlw 20 arc minutes away from north celestial pole. We therefore point the reticule (or just the middle of our binocular's field of view) just a little (about a quarter of the distance of Polaris to Lambda Ursae Minoris) above the center of this connecting line (see picture below, right side). To be able to judge these distances right, one would prefer to use a scope or binocular, whose magnification isn't to big, so one can see all important stars in the scope at one time.
Done! We have achieved polar alignment. The barndoor should be standing before us ready to use, and that when looking north form behind the barndoor with the hinge at the left (western) side. Now the camera can be pointed at the object of interest and after carefully focusing at infinity, the exposure can begin.
There are many types of barndoors: single arm and double arm, tangential and isosceles, motor driven or not, etc.
For more construction tips and more background information than I can deliver, please see the following links
Brian Rachfords tips for building a single arm barndoor:
http://origins.colorado.edu/~rachford/widefield/barndoor.html
Peter Bavoets' tips for building a Trott Type 4:
http://www.albany.net/~zardoz/barndoor.html
Ray Grovers' plan for a stepping motor driven scotch mount:
http://www.u-net.com/ph/mas/projects/scotch/scotch.htm
Stephen Tonkins Page with background information to different types of barndoors and tips for building a double arm scotch mount:
http://www.astunit.com/tonkinsastro/atm/projects/scotch.htm
And two fine links to get you started (for there are so many good astrophotography and astronomy websites):
Astronomie.de, a very nice portal site for astronomy and a big editorial section as well as basic articles and some teaching projects (german language only):
http://www.astronomie.de
Jerry Lodriguss' Catching the Light Astrophotography Site: A very fine piece of astrophotography and excellent web design. Not only beautifuls photographs but also a good amount of background information regarding beginning astrophotography. Contrary to so many other sites, there is no break between some boring photos, taken with normal cameras and lenses, and stunning deep sky pictures, only achievable with really expensive telescope equipment. Even his wide field and basic astro photos are great and therefore really motivating:
http://www.astropix.com/INDEX.HTM
22.12.2002